LinearLayout又称作线性布局,是一种非常常用的布局。正如它的名字所描述的一样,这个布局会将它所包含的控件在线性方向上依次排列。既然是线性排列,肯定就不仅只有一个方向,这里一般只有两个方向:水平方向和垂直方向。
下面我们将LinearLayout(线性布局)常用到的属性简单归纳一下:
属性1:android:orientation 指定线性布局的方向(水平或者垂直)
属性2:android:width 线性布局的容器宽度
属性3:android:height 线性布局的容器高度
属性4:android:background 线性布局的背景
属性5:android:gravity 线性布局中,子容器相对于父容器所在的位置
1属性值:
android:orientation="horizontal" 指定线性布局方向:水平
android:orientation="vertical" 指定线性布局方向:垂直
2.属性值:
android:width="xxxdp" 指定线性布局的容器宽度为:xxxdp
android:width="wrap_content" 指定线性布局的容器宽度为:根据容器内容宽度大小来填充屏幕宽度
android:width="match_parent" 指定线性布局的容器宽度为:撑满整个屏幕宽度
3.属性值:
android:height="xxxdp" 指定线性布局的容器高度为:xxxdp
android:height="wrap_content" 指定线性布局的容器高度为:根据容器内容高度大小来填充屏幕高度
android:height="match_parent" 指定线性布局的容器高度为:撑满整个屏幕高度
4.属性值:
android:background="#000" 指定线性布局的背景为:黑色(rgb颜色)
android:background="@android:color/black" 指定线性布局的背景为:黑色(引用android系统自带的原始黑色)
andrid:background="@color/colorPrimary" 指定线性布局的背景为:(根据res/color.xml 中的colorPrimary所定义的颜色设置)
5属性值:
android:gravity="center" 指定线性布局中,子容器相对于父容器所在的位置为:正中心
android:gravity="cente_verticalr" 指定线性布局中,子容器相对于父容器所在的位置为:垂直方向的正中心
android:gravity="center_horizontal" 指定线性布局中,子容器相对于父容器所在的位置为:水平方向的正中心
android:gravity="left" 指定线性布局中,子容器相对于父容器所在的位置为:最左边(默认)
android:gravity="right" 指定线性布局中,子容器相对于父容器所在的位置为:最右边
android:gravity="top" 指定线性布局中,子容器相对于父容器所在的位置为:最上方(默认)
android:gravity="bottom" 指定线性布局中,子容器相对于父容器所在的位置为:最下方
下面我们通过代码,分别看下水平和垂直方向上的效果图:
垂直方向:
<?xml version="1.0" encoding="utf-8"?>
<LinearLayout xmlns:android="http://schemas.android.com/apk/res/android"
android:layout_width="match_parent"
android:layout_height="match_parent"
android:background="#000"
android:orientation="vertical">
<Button
android:id="@+id/btn1"
android:layout_width="wrap_content"
android:layout_height="wrap_content"
android:text="btn1"
android:textAllCaps="false" />
<Button
android:id="@+id/btn2"
android:layout_width="wrap_content"
android:layout_height="wrap_content"
android:text="btn2"
android:textAllCaps="false" />
<Button
android:id="@+id/btn3"
android:layout_width="wrap_content"
android:layout_height="wrap_content"
android:text="btn3"
android:textAllCaps="false" />
</LinearLayout>

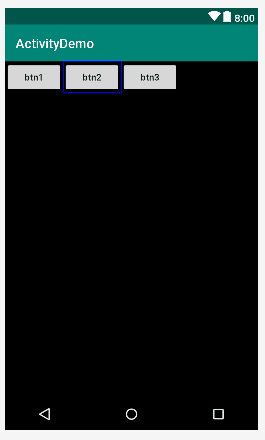
水平方向:
<?xml version="1.0" encoding="utf-8"?>
<LinearLayout xmlns:android="http://schemas.android.com/apk/res/android"
android:layout_width="match_parent"
android:layout_height="match_parent"
android:background="#000"
android:orientation="horizontal">
<Button
android:id="@+id/btn1"
android:layout_width="wrap_content"
android:layout_height="wrap_content"
android:text="btn1"
android:textAllCaps="false" />
<Button
android:id="@+id/btn2"
android:layout_width="wrap_content"
android:layout_height="wrap_content"
android:text="btn2"
android:textAllCaps="false" />
<Button
android:id="@+id/btn3"
android:layout_width="wrap_content"
android:layout_height="wrap_content"
android:text="btn3"
android:textAllCaps="false" />
</LinearLayout>
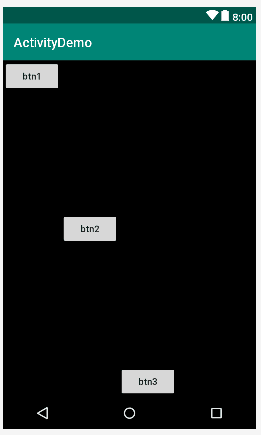
水平方向效果图:
<?xml version="1.0" encoding="utf-8"?>
<LinearLayout xmlns:android="http://schemas.android.com/apk/res/android"
android:layout_width="match_parent"
android:layout_height="match_parent"
android:background="#000"
android:orientation="horizontal">
<Button
android:id="@+id/btn1"
android:layout_width="wrap_content"
android:layout_height="wrap_content"
android:layout_gravity="top"
android:text="btn1"
android:textAllCaps="false" />
<Button
android:id="@+id/btn2"
android:layout_width="wrap_content"
android:layout_height="wrap_content"
android:layout_gravity="center_vertical"
android:text="btn2"
android:textAllCaps="false" />
<Button
android:id="@+id/btn3"
android:layout_width="wrap_content"
android:layout_height="wrap_content"
android:layout_gravity="bottom"
android:text="btn3"
android:textAllCaps="false" />
</LinearLayout>
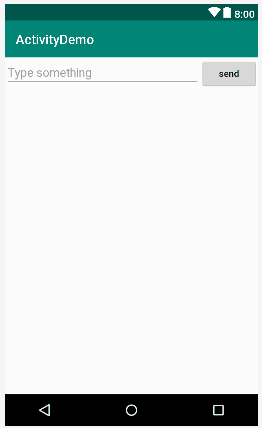
线性方向:水平,通过设置控件的android:layout_weight属性来设置控件与控件之间,在宽度上的权重比例大小,这里就将EditText控件与Button控件的宽度比例设置为1:1,前提是必须先将这两个控件的android:layout_width="0dp".
代码:
<?xml version="1.0" encoding="utf-8"?>
<LinearLayout xmlns:android="http://schemas.android.com/apk/res/android"
android:layout_width="match_parent"
android:layout_height="match_parent"
android:orientation="horizontal">
<EditText
android:id="@+id/et1"
android:layout_width="0dp"
android:layout_height="wrap_content"
android:layout_weight="1"
android:hint="Type something" />
<Button
android:layout_width="0dp"
android:layout_height="wrap_content"
android:layout_weight="1"
android:text="send"
android:textAllCaps="false" />
</LinearLayout>
效果图:
如果只是将EditText控件的
android:layout_width="0dp"
android:layout_weight="1"
而Button控件的
android:layout_width="wrap_content“”
android:layout_weight属性不设置(注意这里没设置了)
代码:
<?xml version="1.0" encoding="utf-8"?>
<LinearLayout xmlns:android="http://schemas.android.com/apk/res/android"
android:layout_width="match_parent"
android:layout_height="match_parent"
android:orientation="horizontal">
<EditText
android:id="@+id/et1"
android:layout_width="0dp"
android:layout_height="wrap_content"
android:layout_weight="1"
android:hint="Type something" />
<Button
android:layout_width="wrap_content"
android:layout_height="wrap_content"
android:text="send"
android:textAllCaps="false" />
</LinearLayout>
 (使用layout_weight实现宽度自适配效果)
————————————————
版权声明:本文为CSDN博主「Android_小牧」的原创文章,遵循CC 4.0 BY-SA版权协议,转载请附上原文出处链接及本声明。
原文链接:https://blog.csdn.net/android_studying/article/details/85911953